In this blog post, I will show you how to create a Microsoft Teams bot to add new bookmarks to the SharePoint list using Microsoft Graph API and implement single sign-on authentication using Microsoft Teams Toolkit for Visual Studio Code version 5. Additionally, we’ll examine how Teams Toolkit may be used in conjunction with our existing Azure resources.
Demo
Before we deep dive, let’s look at the output. The Bookmark bot helps you add new bookmarks to the SharePoint list using Microsoft Graph API. It also implements single sign-on authentication.
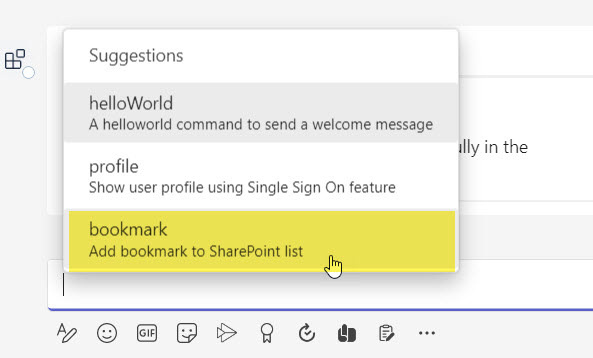
Select the bookmark command from the available bot commands suggestions.
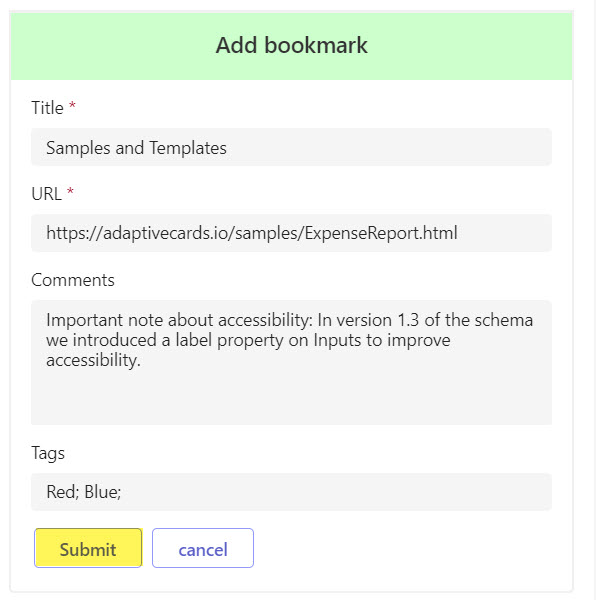
Above bookmark commands will show the following adaptive card for the new bookmark. Fill in the form and click on submit button.
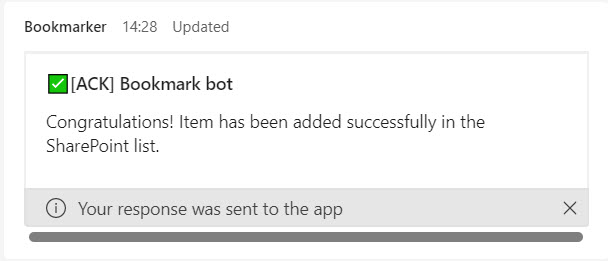
On successful processing of the above bookmark form, you will get a confirmation card
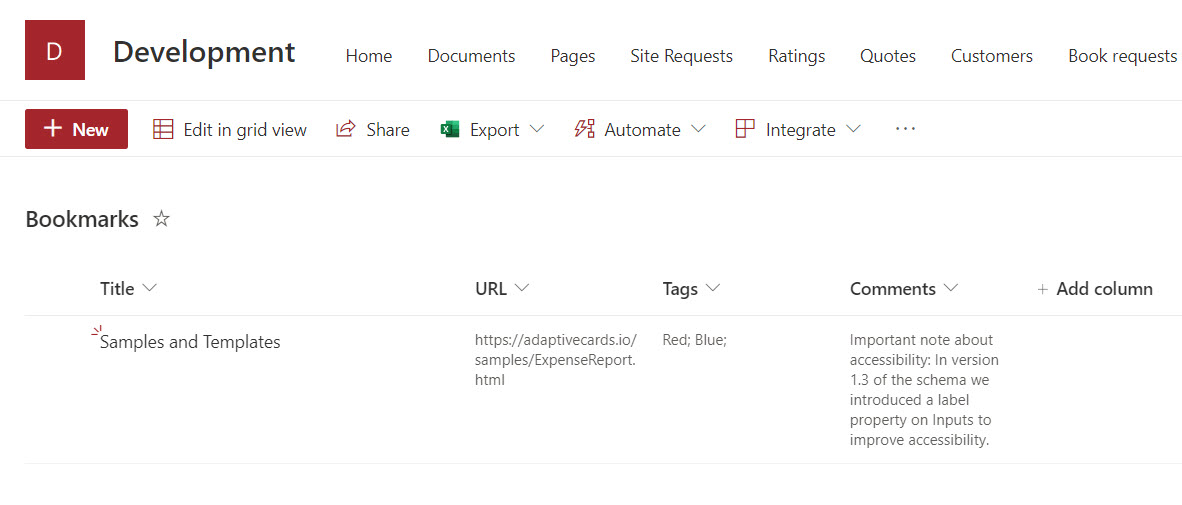
SharePoint list to show the added bookmark
Install Teams Toolkit v5.0 Pre-release
I am using the Teams Toolkit v5.0 pre-release version. From this version, you can use your existing Azure resources as well as your own Ngrok configurations.
Follow the steps in Install a pre-release version and head over to the Teams Toolkit pre-release guide to learn more.
Create a bot app
Open Visual Studio Code.
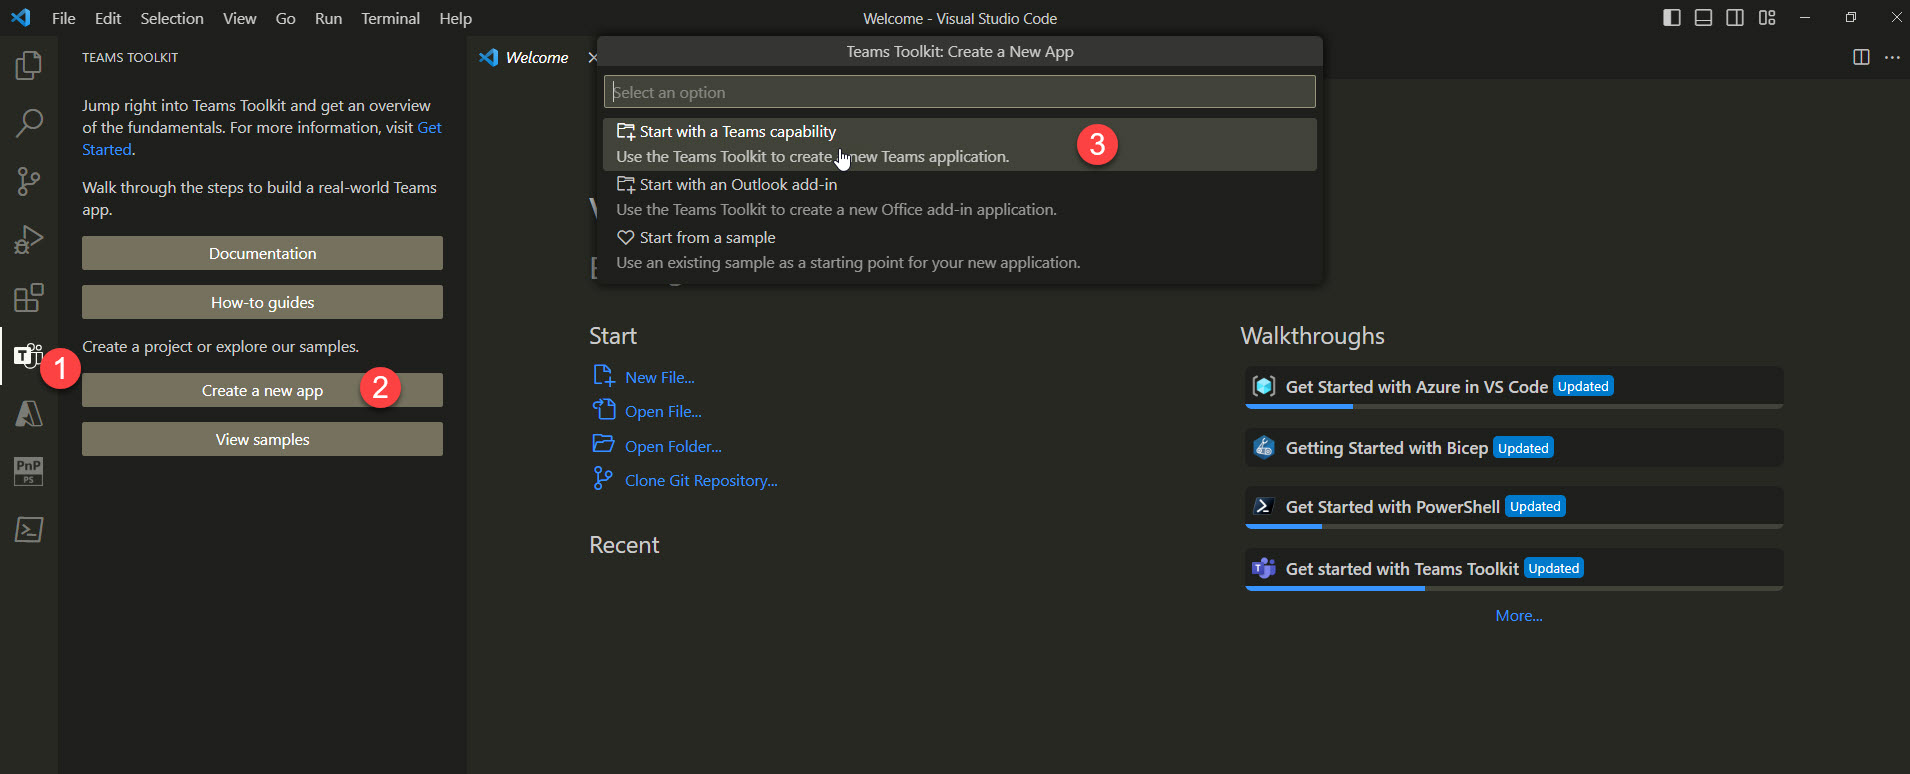
On the sidebar, select the Microsoft Teams icon to open the TEAMS TOOLKIT panel.
On the TEAMS TOOLKIT panel, select the Create a new app button.
On the Teams Toolkit: Create a new Teams app menu, and select Create a new Teams app.
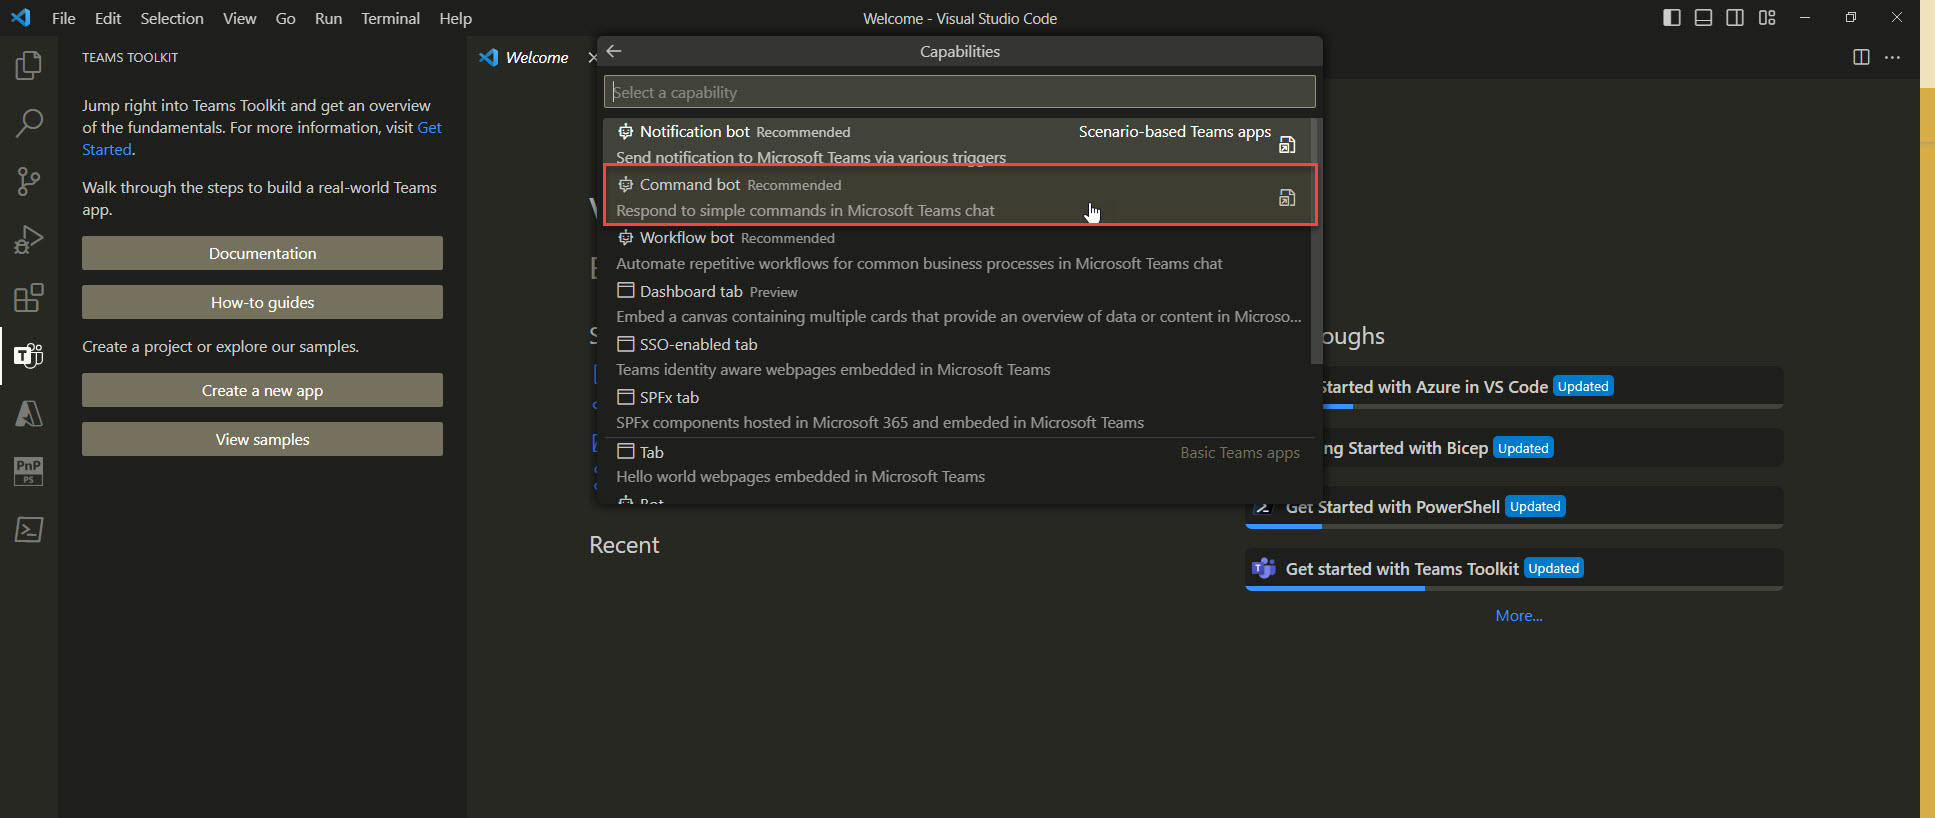
- On the Capabilities menu, select the command bot app template.
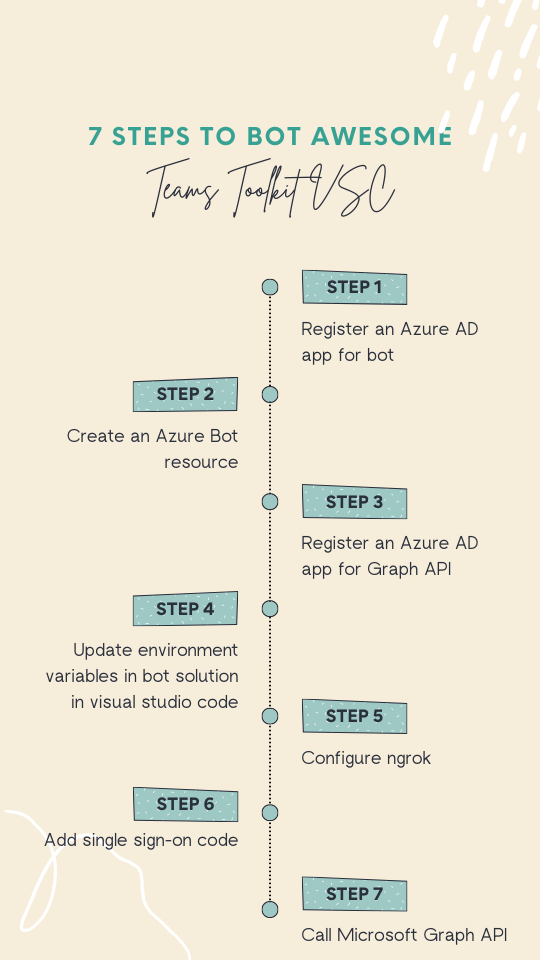
Seven steps to set up Teams bot with single sign-on
Here are the 7 steps to up and running Microsoft Teams single sign-on bot using Teams Toolkit with your existing Azure resources.
STEP 1 - Register an Azure AD app for bot
Register an Azure AD app for a bot
To register an Azure AD app for your bot, you need to follow these steps:
- Go to the Azure portal and sign in with your Microsoft account.
- Click on Azure Active Directory and then on App registrations.
- Click on New registration and enter a name for your app. Select Accounts in any organizational directory (Any Azure AD directory - Multitenant) as the supported account type.
- Under Redirect URI, select Web and enter https://token.botframework.com/.auth/web/redirect as the URI.
- Click on Register to create your app registration.
- Copy the Application (client) ID and Directory (tenant) ID from the Overview page. You will need them later.
- Click on Certificates & secrets and then on New client secret. Enter a description and an expiration date for your secret and click on Add.
- Copy the value of the client secret and save it somewhere secure. You will need it later.
- Go back to Visual Studio Code and open the .env file in your project folder.
- Paste the Application (client) ID, client secret values you copied earlier as the values for the BOT_ID, SECRET_BOT_PASSWORD respectively.
You have successfully registered an Azure AD app for your Microsoft Teams bot.
STEP 2 - Create an Azure Bot resource
Create an Azure Bot resource
To create an Azure Bot resource, you need to follow these steps:
Go to the Azure portal.
In the right pane, select Create a resource.
In the search box enter bot, then press Enter.
Select the Azure Bot card.
Select Create
Provide information under Project details.
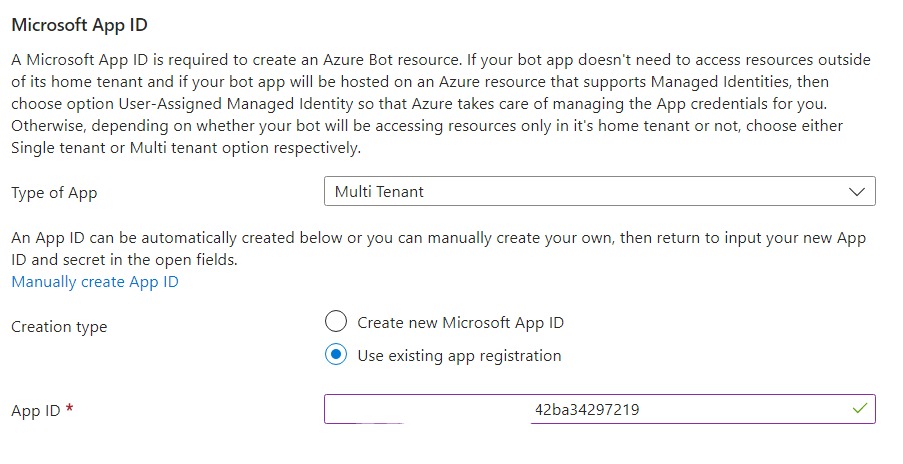
Provide information under Microsoft App ID. Use the existing app registration option and provide the ClientID created in the previous step.
Select Review + create
If the validation passes, select Create.
Navigate to the Azure Bot resource and update the messaging endpoint. In my case, I am using the custom hostname provided by the Ngrok.
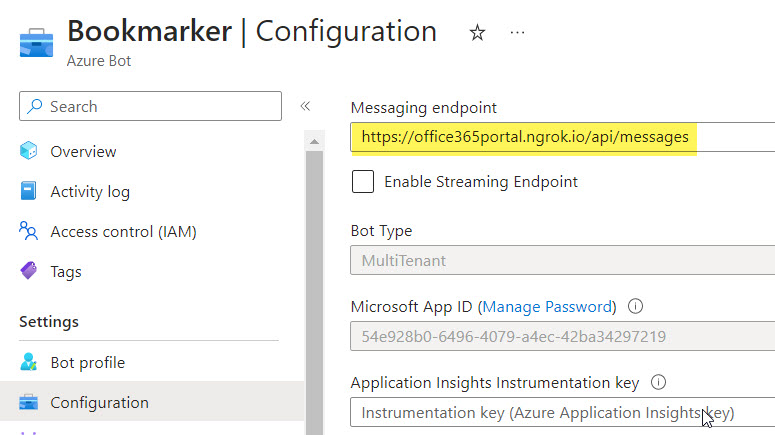
In the left pane, select Channels under Settings. Add the Microsoft Teams channel to your bot.
STEP 3 - Register an Azure Ad app for single sign-on and Graph API
Register an Azure Ad app for single sign-on and Graph API
To register an Azure AD app for single sign-on and Graph API, you can follow these steps:
Sign in to the Azure portal and select your Azure Active Directory tenant.
Select App registrations and then select New registration.
Enter a name for your app, and select the Supported account types.
Select Register to create your app.
In the app’s registration page, select Authentication under Manage.
In the Authentication page, select Add a platform and then select Web.
Enter a redirect URI (https://office365portal.ngrok.io/auth-end.html) for your web application and then select Configure.
In the app’s registration page, select API permissions under Manage.
Select Add a permission, then select Microsoft Graph, then select Delegated permissions, and then select the permissions you want to grant to your app. In my scenario, I need Sites.ReadWrite.All graph API permissions.
Select Add permissions to add the selected permissions to your app.
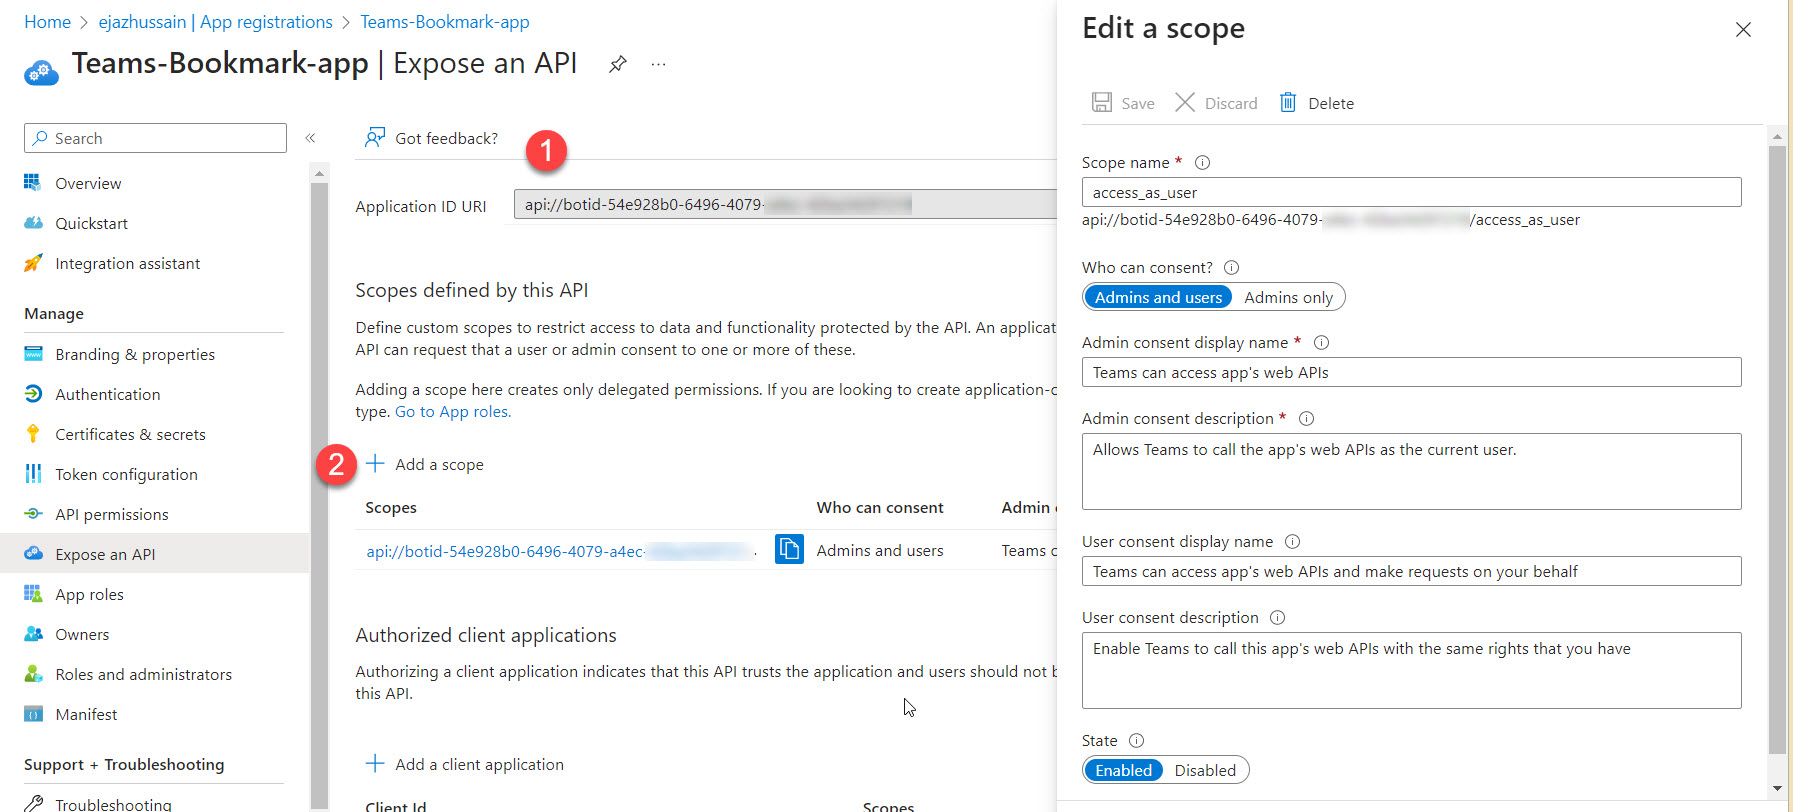
Add Application ID URI and Add a scope as below. Please note: Application ID URI using clientID from the Azure Ad app associated with BOT
Add client applications as below
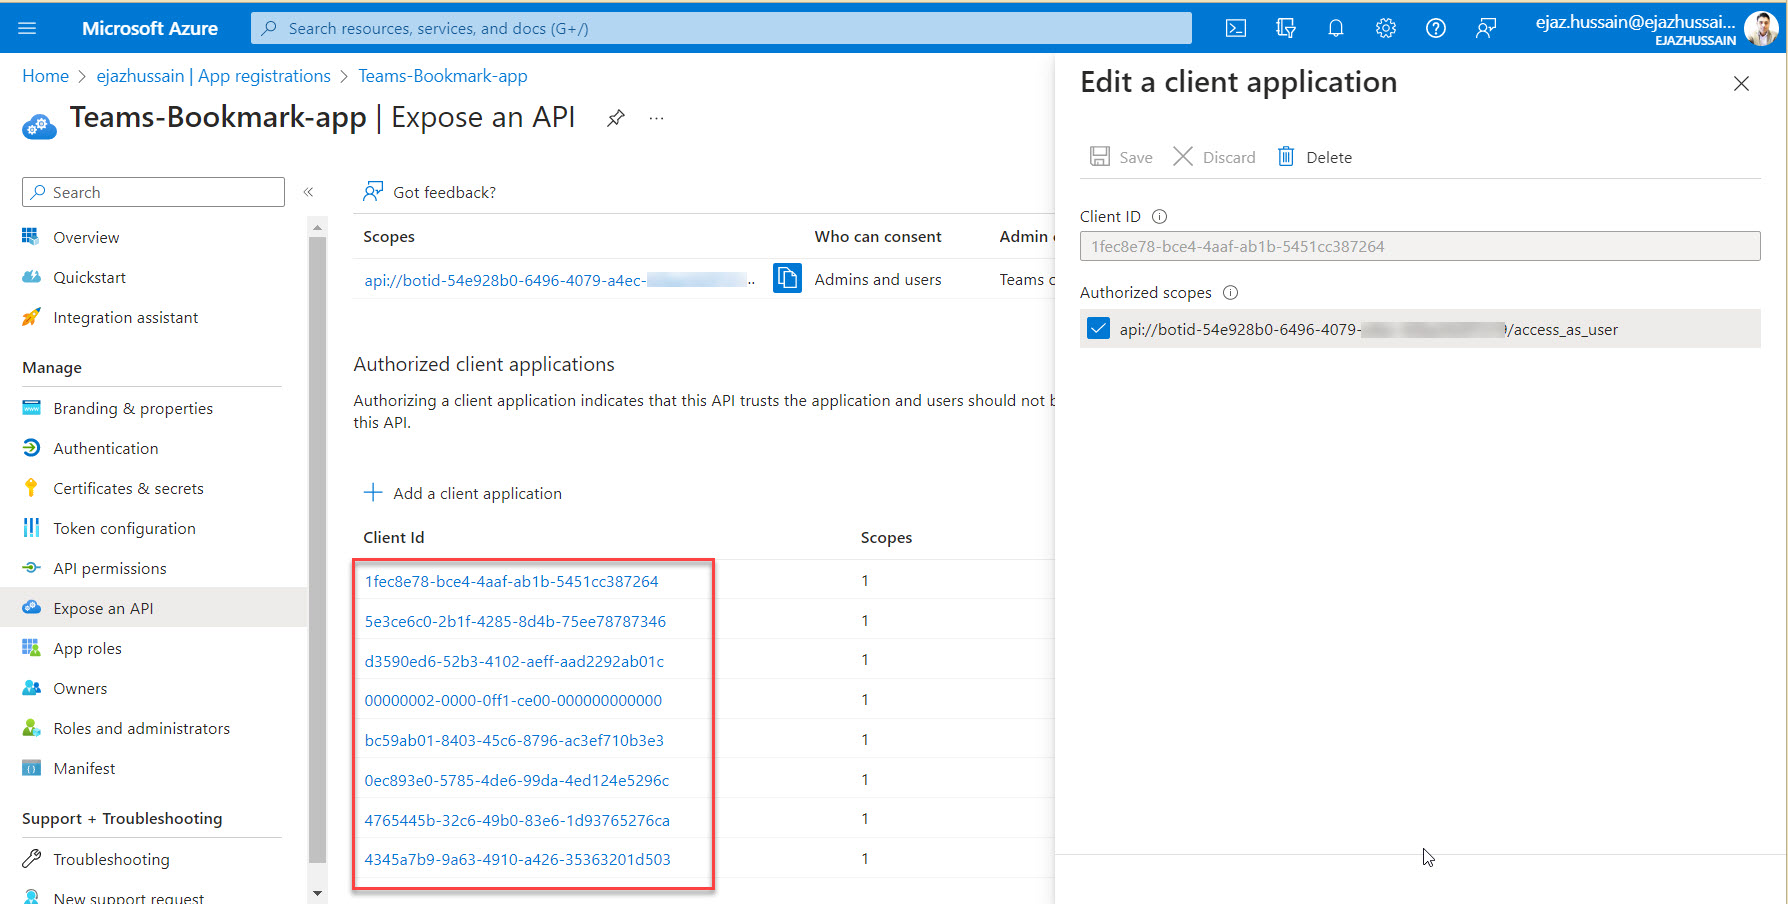
You can find more detailed information about this process in Microsoft’s documentation.
STEP 4 - Update environment variables in bot solution
Update environment variables in the bot solution
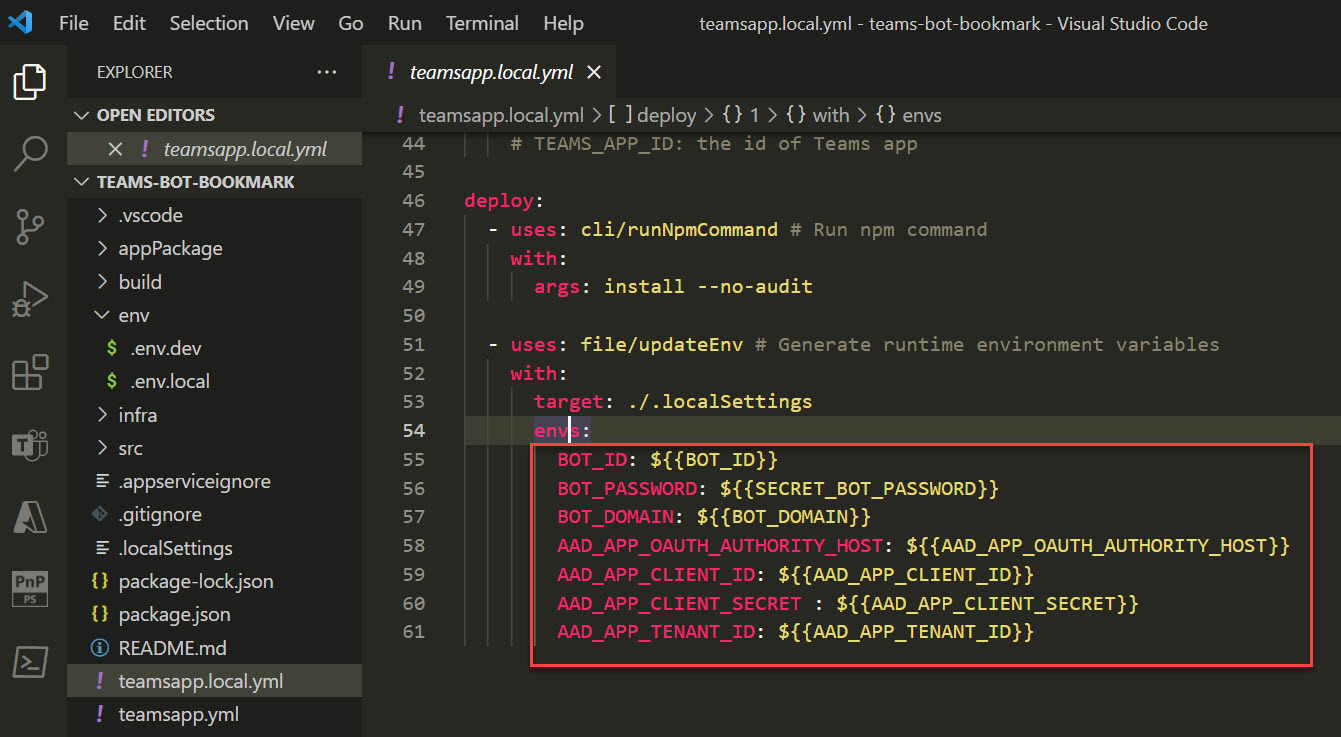
Navigate to your environment file and update the variables below
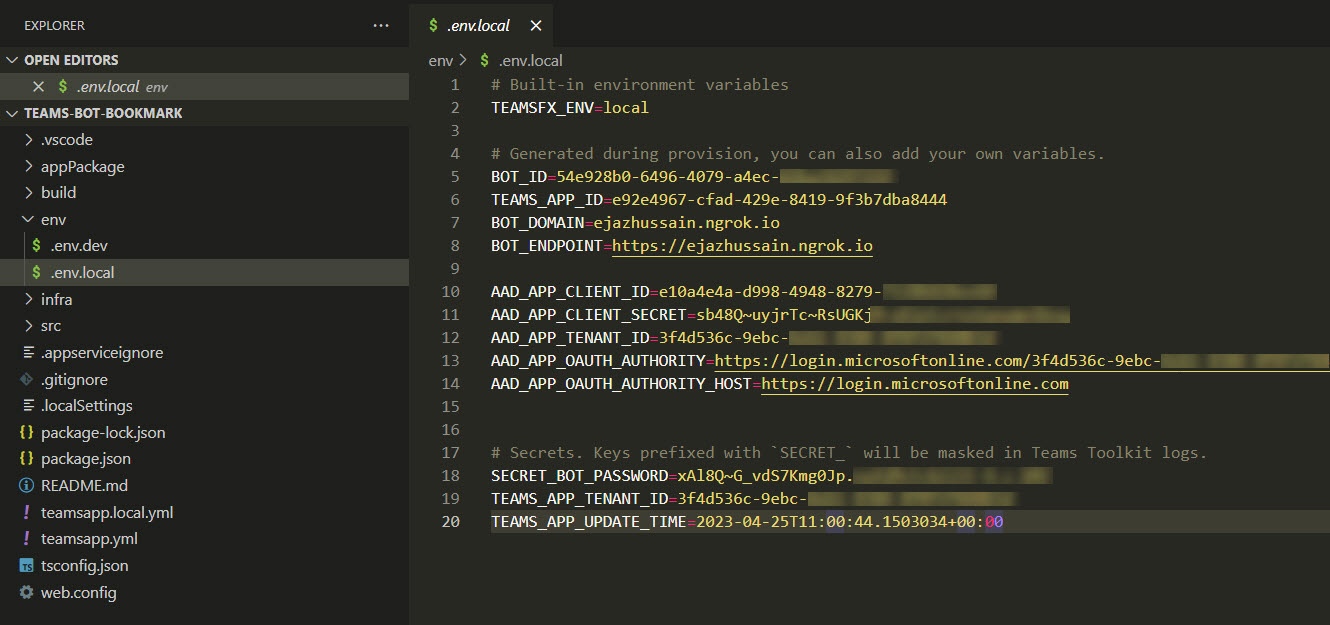
Navigate to the teamsapp.local.yml file and expose the following environmental variables
STEP 5 - Configure Ngrok
Configure Ngrok
A Teams Toolkit generated project has pre-defined a set of VS Code tasks in its .vscode/tasks.json. These tasks are for debugging and have corresponding arguments as inputs.
Update start local tunnel task
- Navigate to .vscode/tasks.json file and update the start local tunnel task with the below Ngrok configurations
{
      // Start the local tunnel service to forward the public ngrok URL to local port and inspect traffic.
      // See https://aka.ms/teamsfx-tasks/local-tunnel for the detailed args definitions,
      // as well as samples to:
      //   - use your own ngrok command / configuration / binary
      //   - use your own tunnel solution
      //   - provide alternatives if ngrok does not work on your dev machine
      "label": "Start local tunnel",
      "type": "teamsfx",
      "command": "debug-start-local-tunnel",
      "args": {
          "ngrokArgs": "http 3978 --host-header=rewrite --hostname=office365portal.ngrok.io --log=stdout --log-format=logfmt",
          "env": "local",
          "ngrokPath": "C:/Tools/ngrok/ngrok.exe",
          "output": {
              // output to .env.local
              "endpoint": "BOT_ENDPOINT", // output tunnel endpoint as BOT_ENDPOINT
              "domain": "BOT_DOMAIN" // output tunnel domain as BOT_DOMAIN
          }
      },
      "isBackground": true,
      "problemMatcher": "$teamsfx-local-tunnel-watch"
  }
STEP 6 - Add single sign-on code
Add single sign-on code
In order to get the single sign-on token in our command handlers, Follow the below steps
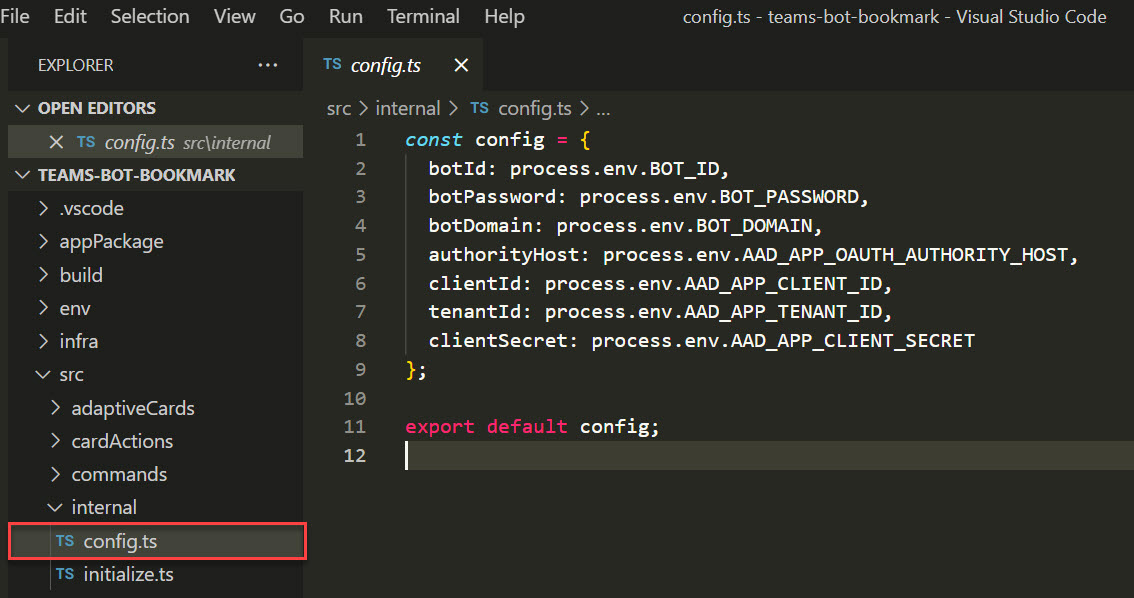
Create config.ts ./internal/config.ts and initialize the environment variables
Create ./src/authConfig.ts to initiliaze authentication configuration for OnBehalfOfCredential
import { OnBehalfOfCredentialAuthConfig } from "@microsoft/teamsfx";
import config from "./internal/config";

const oboAuthConfig: OnBehalfOfCredentialAuthConfig = {
  authorityHost: config.authorityHost,
  clientId: config.clientId,
  tenantId: config.tenantId,
  clientSecret: config.clientSecret,
};

export default oboAuthConfig;
Create BookmarkCommandHandler.ts under ./src/commands folder
import { Activity, CardFactory, MessageFactory, TurnContext } from "botbuilder";
import { CommandMessage, OnBehalfOfUserCredential, TeamsBotSsoPromptTokenResponse, TeamsFxBotCommandHandler, TeamsFxBotSsoCommandHandler, TriggerPatterns, createMicrosoftGraphClientWithCredential } from "@microsoft/teamsfx";
import { AdaptiveCards } from "@microsoft/adaptivecards-tools";
import BookmarkCard from "../adaptiveCards/BookmarkCard.json";
import { BookmarkData, CardData } from "../cardModels";
import oboAuthConfig from "../authConfig";
import { GraphService } from "../services/GraphService";

/**
 * The `BookmarkCommandHandler` registers a pattern with the `TeamsFxBotCommandHandler` and responds
 * with an Adaptive Card if the user types the `triggerPatterns`.
 */
export class BookmarkCommandHandler implements TeamsFxBotSsoCommandHandler {
  triggerPatterns: TriggerPatterns = "bookmark";

  async handleCommandReceived(
    context: TurnContext,
    message: CommandMessage,
    tokenResponse: TeamsBotSsoPromptTokenResponse,
    ): Promise<string | Partial<Activity> | void> {
    console.log(`App received message: ${message.text}`);

    GraphService.Init(tokenResponse.ssoToken);

    // Render your adaptive card for reply message
    const cardData: BookmarkData = {
      header: "Add bookmark"
    };

    const cardJson = AdaptiveCards.declare(BookmarkCard).render(cardData);
    return MessageFactory.attachment(CardFactory.adaptiveCard(cardJson));
  }
}
Create SubmitActionHandler.ts for card submit action handler under ./src/cardActions folder
import { AdaptiveCards } from "@microsoft/adaptivecards-tools";
import { TurnContext, InvokeResponse } from "botbuilder";
import { TeamsFxAdaptiveCardActionHandler, InvokeResponseFactory, AppCredential, createMicrosoftGraphClientWithCredential } from "@microsoft/teamsfx";
import responseCard from "../adaptiveCards/submitActionResponse.json";
import { CardData, IBookmarkForm } from "../cardModels";
import { GraphService } from "../services/GraphService";

/**
 * The `SubmitActionHandler` registers an action with the `TeamsFxBotActionHandler` and responds
 * with an Adaptive Card if the user clicks the Adaptive Card action with `triggerVerb`.
 */
export class SubmitActionHandler implements TeamsFxAdaptiveCardActionHandler {
  /**
   * A global unique string associated with the `Action.Execute` action.
   * The value should be the same as the `verb` property which you define in your adaptive card JSON.
   */
  triggerVerb = "submit";

  async handleActionInvoked(context: TurnContext, actionData: any): Promise<InvokeResponse> {
    /**
     * You can send an adaptive card to respond to the card action invoke.
     */
    const formData: IBookmarkForm = actionData;

    const result = await GraphService.createListItem(formData);

    const cardData: CardData = {
      title: "Bookmark bot",
      body: "Congratulations! Item has been added successfully in the SharePoint list.",
    };

    const cardJson = AdaptiveCards.declare(responseCard).render(cardData);
    return InvokeResponseFactory.adaptiveCard(cardJson);

  }
}
Update the ./internal/initialize.ts file with the SSO configurations, commands and action handlers
import { HelloWorldCommandHandler } from "../commands/helloworldCommandHandler";
import { BotBuilderCloudAdapter } from "@microsoft/teamsfx";
import ConversationBot = BotBuilderCloudAdapter.ConversationBot;
import config from "./config";

import { SubmitActionHandler } from "../cardActions/SubmitActionHandler";
import { ProfileCommandHandler } from "../commands/profileCommandHandler";
import { BookmarkCommandHandler } from "../commands/BookmarkCommandHandler";

// Create the command bot and register the command handlers for your app.
// You can also use the commandApp.command.registerCommands to register other commands
// if you don't want to register all of them in the constructor
export const commandApp = new ConversationBot({
  // The bot id and password to create CloudAdapter.
  // See https://aka.ms/about-bot-adapter to learn more about adapters.
  adapterConfig: {
    MicrosoftAppId: config.botId,
    MicrosoftAppPassword: config.botPassword,
    MicrosoftAppType: "MultiTenant",
  },
  // See https://docs.microsoft.com/microsoftteams/platform/toolkit/teamsfx-sdk to learn more about ssoConfig
  ssoConfig: {
    aad: {
      scopes: ["User.Read"],
      initiateLoginEndpoint: `https://${config.botDomain}/auth-start.html`,
      authorityHost: config.authorityHost,
      clientId: config.clientId,
      tenantId: config.tenantId,
      clientSecret: config.clientSecret,
    }
  },
  command: {
    enabled: true,
    commands: [new HelloWorldCommandHandler()],
    ssoCommands: [new ProfileCommandHandler(), new BookmarkCommandHandler()],
  },
  cardAction: {
    enabled: true,
    actions: [new SubmitActionHandler()],
  },
});
STEP 7 - Create Microsoft Graph API service
Creating Microsoft Graph service
We are going to save our bookmark to the SharePoint list using Microsoft Graph API. Create Microsoft Graph service src/services/GraphService.ts and add the following code.
In the Init method, we are initializing the Microsoft Graph client based on a single sign-on token received by the bookmark command handler.
import { createMicrosoftGraphClient, createMicrosoftGraphClientWithCredential, OnBehalfOfUserCredential } from "@microsoft/teamsfx"; |
Source code
Note
You can find the complete source code from GitHub.
